
Today, we have yet another challenge from Leetcode – the Leetcode 48 Rotate Image problem.
Table of Contents
The Rotate Image Challenge
For this challenge, you are given a n x n 2D matrix (as a list of list) that represents an image. Your job is to rotate the image 90 degrees clockwise.
For instance, suppose you are given the matrix
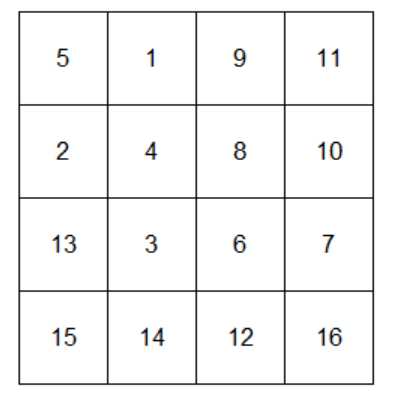
This can be represented as the list of list below:
matrix = [[5,1,9,11],[2,4,8,10],[13,3,6,7],[15,14,12,16]]
You need to write a function called rotate() that accepts matrix as an argument.
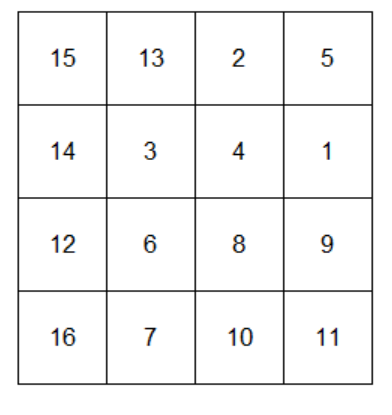
The function needs to rotate matrix 90 degrees clockwise, which gives the image below:
You have to rotate the image in-place, which means you have to modify the input 2D matrix directly. As such, the function does not return any result. The input matrix is modified instead.
To test your function, you can run the following code:
matrix = [[5,1,9,11],[2,4,8,10],[13,3,6,7],[15,14,12,16]]
rotate(matrix)
print(matrix)
You should get the following output:
[[15, 13, 2, 5], [14, 3, 4, 1], [12, 6, 8, 9], [16, 7, 10, 11]]
Suggested Approach
Step 1: Determine Number of Layers
To solve the Rotate Image problem, we can visualize the matrix in layers and rotate the image layer by layer.
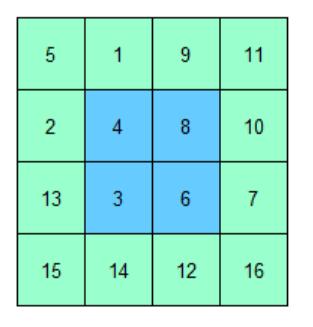
For instance, if it is a 4×4 matrix, it consists of two layers, as represented by the green and blue layers in the image below:
If it is a 5×5 matrix, it consists of three layers (yellow, cyan and white):

However, notice that the innermost layer of the 5×5 matrix above consists only of one cell? As such, we can ignore that layer as there is no need to rotate this layer.
Based on the observations above, we can conclude that for a n x n matrix, we only need to rotate n//2 layers (where // is the floor division operator, which divides two numbers and rounds the result down to the nearest integer).
For instance, for a 4×4 matrix, we need to rotate 4 // 2 = 2 layers.
For a 5×5 matrix, we need to rotate 5//2 = 2 layers.
Step 2: Iterate Over Elements In First Row Of Each Layer (except the last element)
After we determine the number of layers to rotate, we need to iterate over each layer.
For each layer, we need to iterate over all the elements in the first row of that layer, except for the last element.
For instance, for the first layer of a 4×4 matrix, we need to iterate over the elements in the red rectangle shown below:

Step 3: Do 4 Replacements For Each Element
For each element, we need to do 4 replacements.
After doing the replacements for all the elements that we iterate over, the matrix would have been rotated successfully.
Illustration Using a 4×4 Matrix
Let’s use the 4×4 matrix below to illustrate our approach.
Number of Layers
This matrix is made up of 4 // 2 = 2 layers
First Layer
For the first layer, we need to iterate over the elements in the red rectangle.
For the first element in the red rectangle (i.e. matrix[0][0]), we need to do the following replacements:
- Move
matrix[0][0]tomatrix[0][3] - Move
matrix[0][3]tomatrix[3][3] - Move
matrix[3][3]tomatrix[3][0] - Move
matrix[3][0]tomatrix[0][0]
This gives us:

For the second element in the red rectangle (i.e. matrix[0][1]), we need to do the following replacements:
- Move
matrix[0][1]tomatrix[1][3] - Move
matrix[1][3]tomatrix[3][2] - Move
matrix[3][2]tomatrix[2][0] - Move
matrix[2][0]tomatrix[0][1]
This gives us:
For the third element in the red rectangle (i.e. matrix[0][2]), we need to do the following replacements:
- Move
matrix[0][2]tomatrix[2][3] - Move
matrix[2][3]tomatrix[3][1] - Move
matrix[3][1]tomatrix[1][0] - Move
matrix[1][0]tomatrix[0][2]
This gives us:

After iterating over all the elements in the red rectangle, the first layer has been rotated successfully.
Second Layer
For the second layer, we do the following replacements:
- Move
matrix[1][1]tomatrix[1][2] - Move
matrix[1][2]tomatrix[2][2] - Move
matrix[2][2]tomatrix[2][1] - Move
matrix[2][1]tomatrix[1][1]
This gives us:
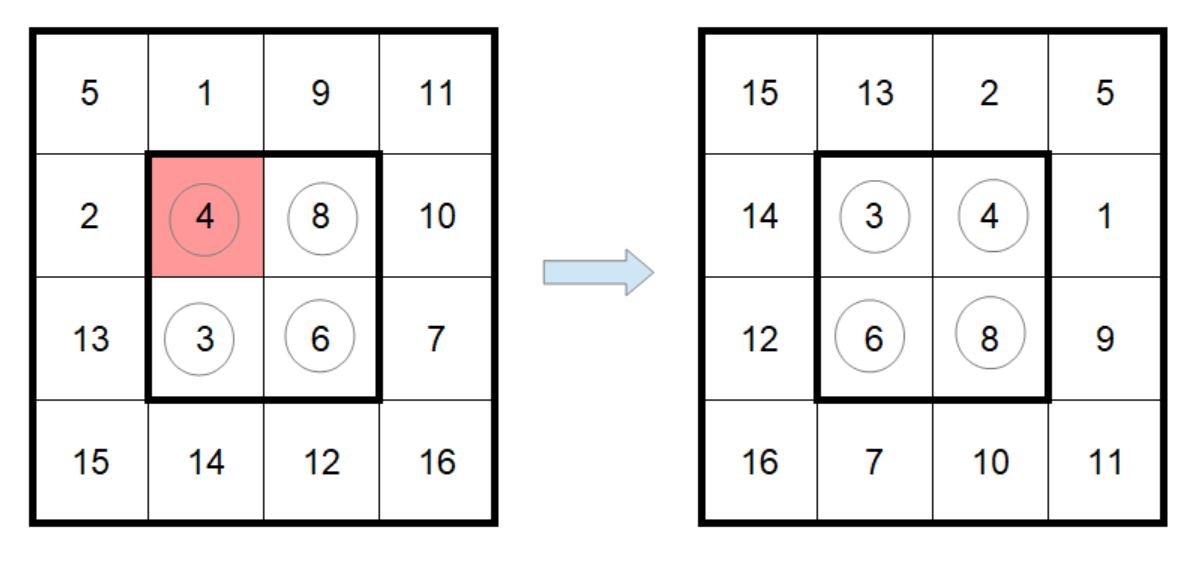
After doing all the necessary replacements, the entire image has been rotated successfully. The final rotated image is shown on the right in the diagram above.
Getting Positions of Rotated Elements
The hardest part for our approach above is determining the relationship between the original and new rows and columns for each replacement.
For instance, when we are at matrix[0][0], how do we determine where we should move the element to?
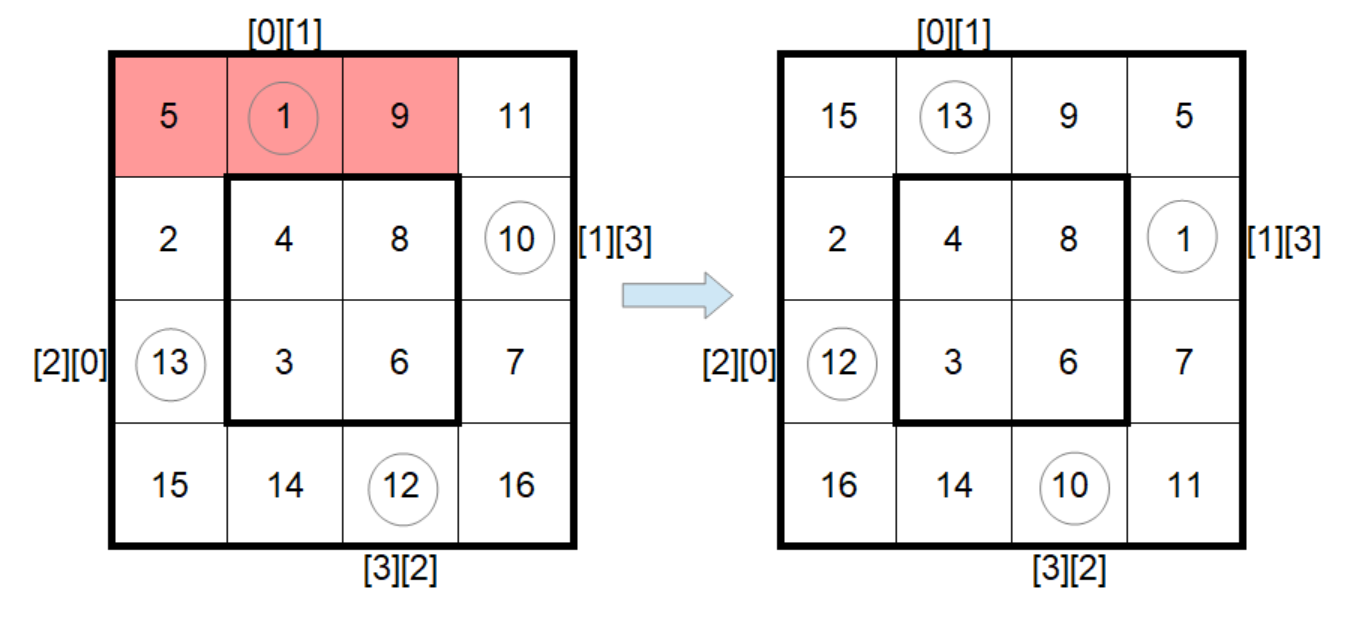
Take some time to think about this. Here’s a hint:

The image above shows the replacements that we need to do for the first 2 elements of a 4×4 matrix. For instance, the first line shows that we need to move the element at row 0, column 0 to row 0, column 3 (i.e. we need to move matrix[0][0] to matrix[0][3]).
Based on the image above, do you notice any pattern?
Take your time.
If you study the image above carefully, you can probably conclude the following:
For a n x n matrix,
- New Row = Original Column (refer to the sections highlighted in red)
- New Column + Original Row = n – 1 (refer to the sections highlighted in blue)
Got it?
Based on the description above, try to solve the Rotate Image problem yourself.
Suggested Solution
The suggested solution for the Leetcode 48 Rotate Image problem is as follows:
def rotate(matrix):

    n = len(matrix)

    for layer in range(n // 2):
        for col in range(layer, n-layer-1):

            cells_replaced = 0
            row = layer

            temp1 = matrix[row][col]

            while cells_replaced < 4:
                new_row = col
                new_col = n - 1 - row

                temp2 = matrix[new_row][new_col]
                matrix[new_row][new_col] = temp1

                temp1 = temp2
                row = new_row
                col = new_col

                cells_replaced += 1
Here, we first define a function called rotate() with one parameter – matrix.
Determining the Length of the Matrix
Inside the function, we use the len() function to determine the length of matrix.
If matrix represents a 5×5 matrix, it’ll be a list with 5 nested lists. Hence, len(matrix) equals 5, which we assign to a variable called n.
Iterating Over The Layers
Next, we use a for loop to iterate over the layers in the matrix. This is accomplished using the expression on line 5.
Iterating Over Elements In Each Layer
On line 6, we have an expression for iterating over the elements (except the last element) in the first row of each layer.
We determine the two arguments for the range() function (layer and n-layer-1) through observation.
Suppose we have a 5×5 matrix as shown below:
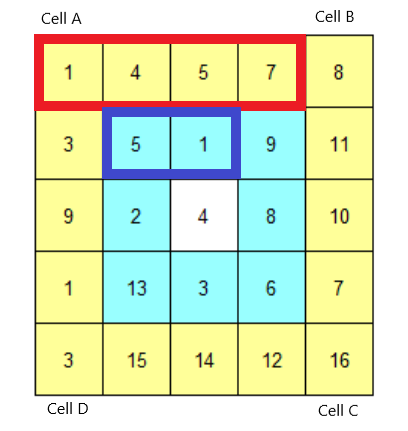
For the first layer (layer = 0), we want to iterate over the elements in the red rectangle. This means we want col to take values from 0 to 3.
For the second layer (layer = 1), we want to iterate over the elements in the blue rectangle. This means col should take values from 1 to 2.
Based on the observations above, we conclude that col starts from layer and ends at n - layer - 2.
For instance, for the first layer, layer = 0. Hence, col starts from layer (0) and ends at n - layer - 2 (5 – 0 – 2 = 3).
For the second layer, layer = 1. Hence, col starts from layer (1) and ends at n - layer - 2 (5 – 1 – 2 = 2).
Doing the Replacements
After we determine the elements that we need to iterate over, we are ready to do the replacements.
For each element, we need to do 4 replacements. This is done using the code from lines 8 to 24.
On line 8, we initialize a variable called cells_replaced to 0.
Next, we assign layer to row. We do this as the row number of each element that we iterate over (i.e. elements in the red or blue rectangles) corresponds to the layer number.
On line 11, we assign the first element in the current layer to a variable called temp1.
After initializing all the variables that we need, we use a while loop (from lines 13 to 24) to do the actual replacement. This while loop runs 4 times.
First Replacement
The first time the loop runs, we want to move the element in cell A to cell B (refer to the 5×5 matrix above).
Within the while loop, we first calculate the indexes of the row and column of cell B. We store these values in the variables new_row and new_col respectively on lines 14 and 15.
Next, we assign the value in cell B to a variable called temp2 on line 17. On line 18, we replace cell B with the value stored in temp1 (which stores the value of cell A at the moment).
After replacing cell B, we update temp1 by assigning the value of temp2 to it. In other words, temp1 stores the original value of cell B now.
Next, we update the values of row and col so that they store the row and column of cell B (on lines 21 and 22).
Finally, we increment cells_replaced by 1.
Subsequent Replacements
The second time the while loop runs, temp1, row and col store the original value, row and column of cell B respectively. We use these new values to calculate the row and column of cell C and do the replacement accordingly.
We keep running the while loop until cells A, B, C and D are replaced with the original values of cells D, A, B and C respectively.
After the while loop is complete, we move on to the next element in the red rectangle. We keep doing the 4 replacements for each element in the red and blue rectangles.
Once that is complete, the image has been rotated successfully.